Tuesday, 25 April 2017

Making the Showreel

Making the Showreel

I made the showreel in Premiere pro cs6, I haven't used the programme that much, but I do find it user friendly.  The first showreel needed some improvements.   I hadn't made the best of the producing.  Several of the images weren't close enough so I re-rendered them and edited them again.   I did encounter a problem importing the Mudbox turnaround but it was my choice of video.  I had used a .mov file and should have used a sequence.   After setting the project, it was still necessary to change the frame rate on importing the image sequences into premier to keep the settings as intended. For the last stages, I made title cards and headers, then selected the times for the introductions, and adding the sound and music as required.  There is still room for improvement with the over all project, and Ill keep working on improving it.

Images improved by focusing closer before rendering a batch


Monday, 24 April 2017

Evaluation of Project


Maya Project Evaluation

Beginning with the bouncing ball.  I had to follow every step from the instructions to produce the bouncing ball.  It took a few attempts before it began to flow more naturally. There was also a small issue with the co-ordinates which originally caused the ball to cut through the base on landing, this matter was sorted by adjusting the figures slightly.  As it was the first project I also had to learn how to do a batch render.  The project looked fine until I tried a single frame render and it showed that the lighting was quite wrong.  It took some time to fix, changing light direction and source.  The Graph Editor at this point was quite straight forward and I found it very useful.

The Flour Sack was the first rig I had used so I practiced a couple of times just changing the shape and moving it about.  One issue I had with this was trying to move keyframes.  This still needs some attention.  The Graph Editor was very different with this rig, I found it easier to use the manual manipulators.

The Moom Character is a rig which we were asked to produce some facial movement's, a blink or a smile.  This wasn't too difficult but I had to re-arrange it a few times .

In the initial stages of working with Maya, setting the project was causing some difficulties.  This changed the more I used it and I became comfortable with it after a few attempts.   Assigning new materials took some practice, and trying to find a texture that was genuinely seamless.  It still can cause some problem, not every image comes in.  But as I'm now familiar with how it works I can usually find a solution.  Knowing what should be happening, makes it easier to notice if the problem is a glitch or my error.  Unfortunately, I do not always know how to fix the glitches.  This seems to be the most time consuming part of working with Maya, a ten minute job could take an hour with nothing to show at the end due to malfunctions.

I have learned a lot during the last few projects with this software programme.  However, I do need to gain a better understanding of the graph editor and how to separate its functions.  I've been relying on the manipulators on the rigs mainly because I haven't gained enough control of the Graph Editor.  Also, I need to take all of the elements from each of the projects done so far, and combined them in one project and continue to practice using them in order to keep up the skills already developed.


Saturday, 22 April 2017

Moom character facial movements

Getting to know the rig ' Moom'.  Having only the face to work with to show emotion or movement, I tried to get the character to grin and blink.


I thought giving how restricted I am with this rig, and the position that its in, it looks like its about to jump.  So I decided to put it on a window ledge and try to make it look nervous with a blink and some jaw movements.

Jumping Flour Sack

Images one to four, the initial stages of this project was to familiarise myself with the rig, practice turning it and trying to manipulate it into different positions. In images five to seven, a very basic jump is practiced, placing keyframes at certain points and repositioning the sack to animate a jump when played through the frames.


Above shows each frame in a sack leap with some more movement of the sack anatomy, from start to finish.


In images one and two, I've added colour and changed the angle of the camera. I removed the floor as it was being selected instead of the sack manipulators when I needed to make adjustments. The jump wasn't landing in the correct position after I made the moves, it was landing below the floor line.  I used the ghosting option to help see what needed to be changed.  As I adjusted the sack I made more mistakes and moved it out of sinc with the rest of the action.  It took some time to realign the rig.
I decided to add an image with some dimension as the floor.   It looked good but meant that I had to stretch the sack jump.  In theory this is simple, move the end point and reposition the arc. In practice this was anything but easy.  I had a lot of difficulty trying to move the keyframes.  The red line would move but the action remained in the same old position.  I finished with the sack landing in such a way that it looked more like a magic carpet ride than a jump.


I decided to start again and this time used different background and ground.  I had the same trouble when moving keyframes,  The red line moved and it did something to the action which I'm not sure of.  The sack appeared to be having a fit mid flight.  I had to move the keys back and forth and eventually move the sack at each frame individually thus causing keyframes at every frame.  I'm not entirely happy with the movement but I'm struggling to maintain control of the movement in each frame.  I have tried repeatedly to adjust the graph editor to no avail, it remains a mystery to me.  I do like the scenery that I've chosen but I would prefer if I had my flour sack run or walk to the point of the jump however no matter how I try to move the frames forward I can't get it to co-operate.


Bouncing Ball Maya

The initial ball as seen in first two images is too small, adjustments have been made to enlarge the ball.  As can be seen from this point onward.  In images two -five a background has been inserted, but has not yet been placed in the correct chosen position.  Movement can be seen in these shots, including squash in image four and stretch in image five.  In image seven the background is positioned and in in image eight colour is added to both the ground and background.
In images nine and ten, a different texture is tried in the background and new colour added to the ball.
At this stage the bouncing ball project is still in progress.  


At this stage I added another wall to give a different dimension. Still unhappy with the look I've changed the background and ground.  Using an image of leafy tarmac for the ground and a brick texture for the wall.  I've changed the colour of the ball again to red as I think it sits better with the new background etc,  In image three it is noticeable that the ball cuts into the ground as it makes contact.  In image four I've tilted the scene so its easier to see the change in the land position.
The original dimension of the ball was 2.5, the directions on the brief did not allow for this.  In order to correct the error, each of the co-ordinates had to be changed by adding 2.5 to their original value.  
After making these corrections I inserted the third wall again and found what I hope is the best angle for the animation.


At this point of the project lighting is the last issue.  When rendering the project the lighting is proving to be a complication.  I have adjusted it several times in different ways as can be seen above.

Final image with the lighting adjusted giving an acceptable finish, ready for batch render.


3D Research - The flour sack animation


3D Research- Emotional Sack


3D research - Basic Blink


3D research- bouncing balls, light and heavy


Thursday, 9 March 2017

Bouncing Ball in Maya

Initial image
 

As Above - view in motion

Ball Size Corrected and back panel inserted


Showing stretch on approach to ground

Showing squash to ball on contact

showing the incorrect position of the ball on contact - goes through the grid


 Same image with colour added

Changed textures and ball colour


Showing squash in current render


Rendered view of same 


Additional wall and correct positioning of ball - changing coordinates to allow for ball radius bringing the ball to the grid not through it.
Rendered view of same


Rendered view with improved backgrounds and colour change on ball

Thursday, 9 February 2017


2050 Scene with new bridge added
As above with bridge rendered
Same scene with some lighting issues
Scene with lighting adjusted and adequate shadows


Tuesday, 7 February 2017

After some building changes and many unsuccessful attempts to alter bridge

Monday, 30 January 2017

More textures and colour added
Current rendered image with bridge

Sunday, 22 January 2017

Saturday, 21 January 2017

Scene Planning

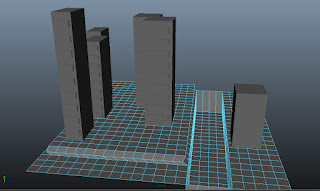
Starting Layout
Structuring a building

Town Scene 2050


Planning the layout
Re-ordering the buildings


Work in progress


 Starting come together